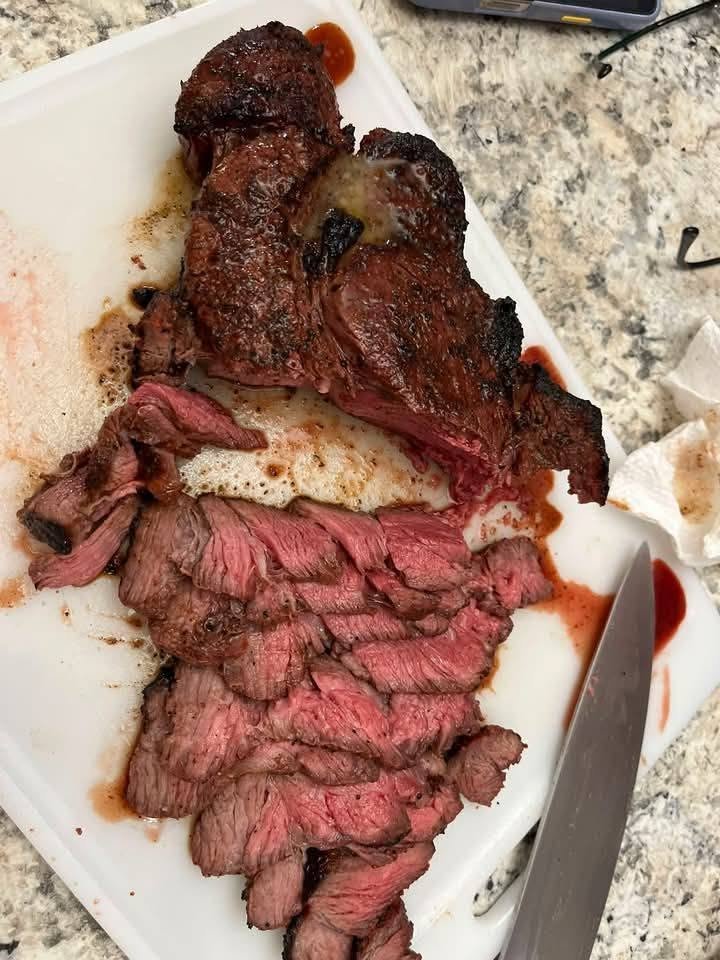
What Makes a Ribeye Special?
-
The Cut: It comes from the rib primal, the same area as prime rib. The muscles there don’t do much work, so the meat is exceptionally tender.
-
The Marbling: The rich network of intramuscular fat melts as it cooks, naturally basting the steak from the inside. This is where the deep, beefy flavor comes from.
-
The “Eye” and the “Cap” (Spinalis Dorsi): A ribeye has two main parts. The large central “eye” is leaner and tender. The outer crescent-shaped “cap” is the most prized part, with the most intense marbling and flavor.
Step 1: Choosing Your Steak
-
Thickness: Look for a steak that is at least 1.5 inches thick. This gives you enough time to develop a deep, dark crust without overcooking the center. A thin steak will be well-done before a crust can form.
-
Marbling: Look for fine, white flecks of fat distributed evenly throughout the meat, not just in big chunks on the outside. USDA Prime has the most, followed by Choice.
-
Bone-In vs. Boneless: A bone-in ribeye (often called a cowboy steak) adds a bit of theatrical presentation and the meat next to the bone can be more flavorful. However, a boneless ribeye cooks more evenly and is easier to handle. Both are excellent; choose based on preference.
Step 2: Essential Preparation (Do Not Skip This)
-
Unwrap and Dry: Take the steak out of its packaging. Pat it extremely dry with paper towels. Surface moisture is the enemy of a good crust.
-
Season Boldly: A thick ribeye needs more salt than you think. Season liberally on all sides with kosher salt (it’s easier to see and control than table salt) and freshly ground black pepper. This can be done right before cooking, but for the best, most deeply seasoned result, see the dry brining option below.
-
Temper (Optional but Helpful): Let the steak sit on a wire rack over a baking sheet at room temperature for 30-60 minutes. This takes the deep chill off, helping it cook more evenly.
Pro Move: Dry Brine for a Superior Crust
For a steakhouse-quality crust and deeply seasoned interior, season the steak and place it uncovered on a wire rack in the refrigerator for at least 2 hours, but ideally overnight. The salt draws out moisture, dissolves, and is then reabsorbed into the meat. The fridge’s dry air perfectly desiccates the surface, ensuring an amazing crust. Just take it out 30 minutes before you plan to cook.
Step 3: The Cooking Methods
You have two goals: a deep brown crust and a perfectly medium-rare interior. There are two primary methods to achieve this.
Method A: The Reverse Sear (Foolproof and Reliable) – Highly Recommended
This is the most consistent way to get an edge-to-edge pink interior with a perfect crust.
-
Cook Low and Slow: Place your seasoned steak on a wire rack over a baking sheet. Cook in a low oven or smoker at 225-275°F (107-135°C) until the internal temperature reaches 10-15°F below your target final doneness.
-
For Medium-Rare (Target 130-135°F): Pull it at 115-120°F.
-
This can take 30-50 minutes depending on the thickness and oven temperature.
-
-
The Searing Inferno: While the steak is warming, get a heavy pan (cast iron is ideal) screaming hot over high heat. Add a tablespoon of a high smoke-point oil like avocado or canola oil.
-
Sear Fast: Place the steak in the pan. Sear for 60-90 seconds per side, pressing down gently to ensure full contact, until a deep, mahogany crust forms. Immediately sear the fat cap edges with tongs.
-
Baste and Rest? NO!: Because you reverse-seared, you do not need to rest the steak. The low-and-slow cook relaxes the muscle fibers, so it won’t lose much juice. Slice immediately and serve.
Method B: The Classic Pan-Sear & Baste (Faster & More Traditional)
-
Get the Pan Hot: Heat a heavy cast-iron skillet over high heat. Add the oil.
-
Sear Side 1: Lay the steak in the pan, presentation-side down. Cook without moving for 3-5 minutes until a deep crust forms.
-
Flip, Add Aromatics, and Baste: Flip the steak. Immediately add 2-3 tablespoons of butter, 2-3 smashed garlic cloves, and a few sprigs of fresh thyme or rosemary. Tilt the pan so the butter pools, and use a large spoon to continuously baste the foaming butter over the top of the steak for another 3-5 minutes.
-
Check Temperature: Use an instant-read thermometer to hit your target. For medium-rare, pull the steak off the heat at 125-130°F.
-
Resting is Mandatory: The high-heat method tenses the muscle fibers. Rest the steak on a cutting board under a loose tent of foil for 8-10 minutes. The internal temperature will rise another 5 degrees to a perfect 135°F, and the juices will redistribute.
Target Temperatures Chart
Always use an instant-read thermometer—it’s the only way to be sure.
| Doneness | Pull from Low Oven (Reverse Sear) | Pull from Pan (Classic Sear) | Final Temp After Rest |
|---|---|---|---|
| Rare | 105°F (41°C) | 120°F (49°C) | 125°F (52°C) |
| Medium Rare | 115-120°F (46-49°C) | 125-130°F (52-54°C) | 130-135°F (54-57°C) |
| Medium | 125-130°F (52-54°C) | 135-140°F (57-60°C) | 140-145°F (60-63°C) |
| Medium Well | N/A | 145-150°F (63-66°C) | 150-155°F (66-68°C) |
Step 4: The Final Touches
-
Slice Against the Grain: Identify the direction of the muscle fibers and slice perpendicular to them. This shortens the fibers, making each bite more tender. On a ribeye, the grain of the cap runs differently from the eye, so separate the cap and slice each piece against its respective grain.
-
Finishing Salt: A final, light sprinkle of flaky sea salt (like Maldon) right before serving adds a delightful crunch and a clean burst of flavor.
Enjoy your perfectly cooked ribeye.